

It’s exciting to write my first post in the DIY series. This is not the first DIY project I have done, but this is a special house warming gift, so it feels appropriate to start with this one.
Recently I had access to some old car tires. Four tires! Woohooo.. I was super excited. I started scouring the internet for ideas on how to turn them into ottomans. I wanted to leave the top removable, so I can create a storage space inside the tire. So I started out with this design project as inspiration. I liked that this is frugal, has storage space (score, since the person I was gifting this to lives in a small city apartment) and that it can be moved with ease, just roll it around. I didn’t want to leave the tire exposed like that though. Therefore, I came up with the idea to thread it up. I made a removable cushion for the top to seat on and sealed the bottom with a plywood sheet, so as to create the storage compartment. In this post, I will give step-by-step instructions for how to build you very own tire storage ottoman.
Materials

I have listed all items I used below with their vendors and approximate prices:
- old car tire (from a family member, for free)
- 1/4″ thick plywood sheet, cut round to desired diameter (to close tire bottom) (Lowe’s-$5)
- 1″ thick wood panel, cut round to desired diameter (to make a sturdy seat base for top) (Lowe’s-$6)
- cotton piping (amazon- $19.5)
- dye- navy ($6)
- hot glue gun ($12)
- nails and drill (I had these at home)
- polyester fiber fill for cushion (Jo-Ann-$10)
- cotton batting (Jo-Ann-$6)
- fabric (Jo-Ann-$10)
- staple gun (Lowe’s- $12)
In the steps below, I have provided links to purchase some of these items online. They are not affiliate links. Also, note, that I have shopped for some of these items on sale. You should try the same. You might have some of the tools at hand already, in which case more power to you!
Your Map to building tire storage ottoman
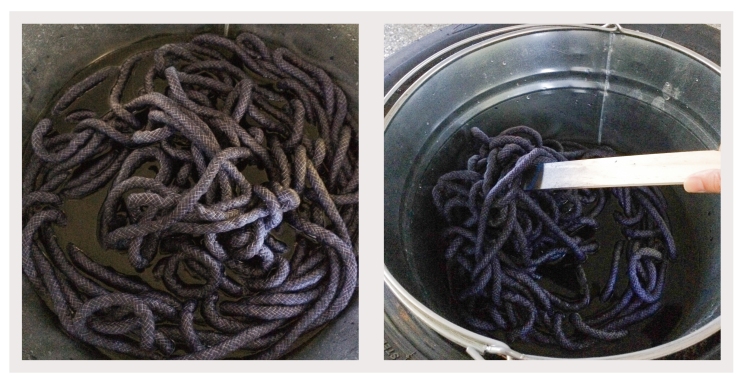
- For the thread, I wanted to be able to dye the thread navy, so I ordered cotton piping and got navy fabric color. I needed about 2.5 rolls of this piping; that’s about 125 yards for one old Yaris tire. I dyed all the piping navy per instructions on the dye bottle. For pure cotton piping, I added some salt to my dye bath, again according to instructions on the dye bottle. If you don’t want to spend time on this, you can buy colored ropes directly. Dyeing was fun but it was time consuming. I really loved how the thread that holds the piping together remained white (since it was 100% polyester) and the cotton piping itself got deep navy color.
- After it was all dried, I started draping it around the tire with hot glue gun. I also got hot glue gun on amazon. This draping and gluing is easy but again time consuming.
- Once I was done with the thread, I started with the bottom cover. I cut a 1/4″ inch thick plywood sheet to 17 inch diameter with my handheld jig saw. I also cut the top the same diameter, but from a sturdier 1″ inch thick wood panel.
- I placed the plywood sheet on top of the tire and then proceeded to create 8 holes around the periphery of the plywood+tire with my drill. You want to use threaded bolts for this type of fastening. Since the fasteners will be open on the other side (inside the storage compartment, when looking from top), using pointed sharp wood screws is not a good idea. Use nuts and bolts, so you can fasten the tire and plywood together, while leaving the inside non-sharp. Safety first. Seriously! Well, so I drove the bolt in, flipped the tire over, closed in with a nut and I was done creating the storage compartment.
- The last thing, seat cushion. I cut my own 17 inch diameter wood panel but you can get one ready-made at at Home Depot. I put on the polyester fabric filling on it, covered it with a piece of batting and finally covered it with the fabric. I didn’t bother cutting any pieces of fabric round, I just folded and tucked the fabric as I went along. I used staple gun to secure the fabric onto the wood panel.
- Once the seat is fully secured, you can roll a small piece of fabric and staple that as well on the underside of the seat cushion as a pull string, so that it can be used to remove the seat to access storage compartment. This step is completely optional though, as the seat cushion can be easily removed even without a pull string.
That’s it! I have some ideas for what to do with other tires, so that will be another post, some other time. Have you made something useful from old car tires? How did that turn out?

How cool!! Love this!
LikeLike